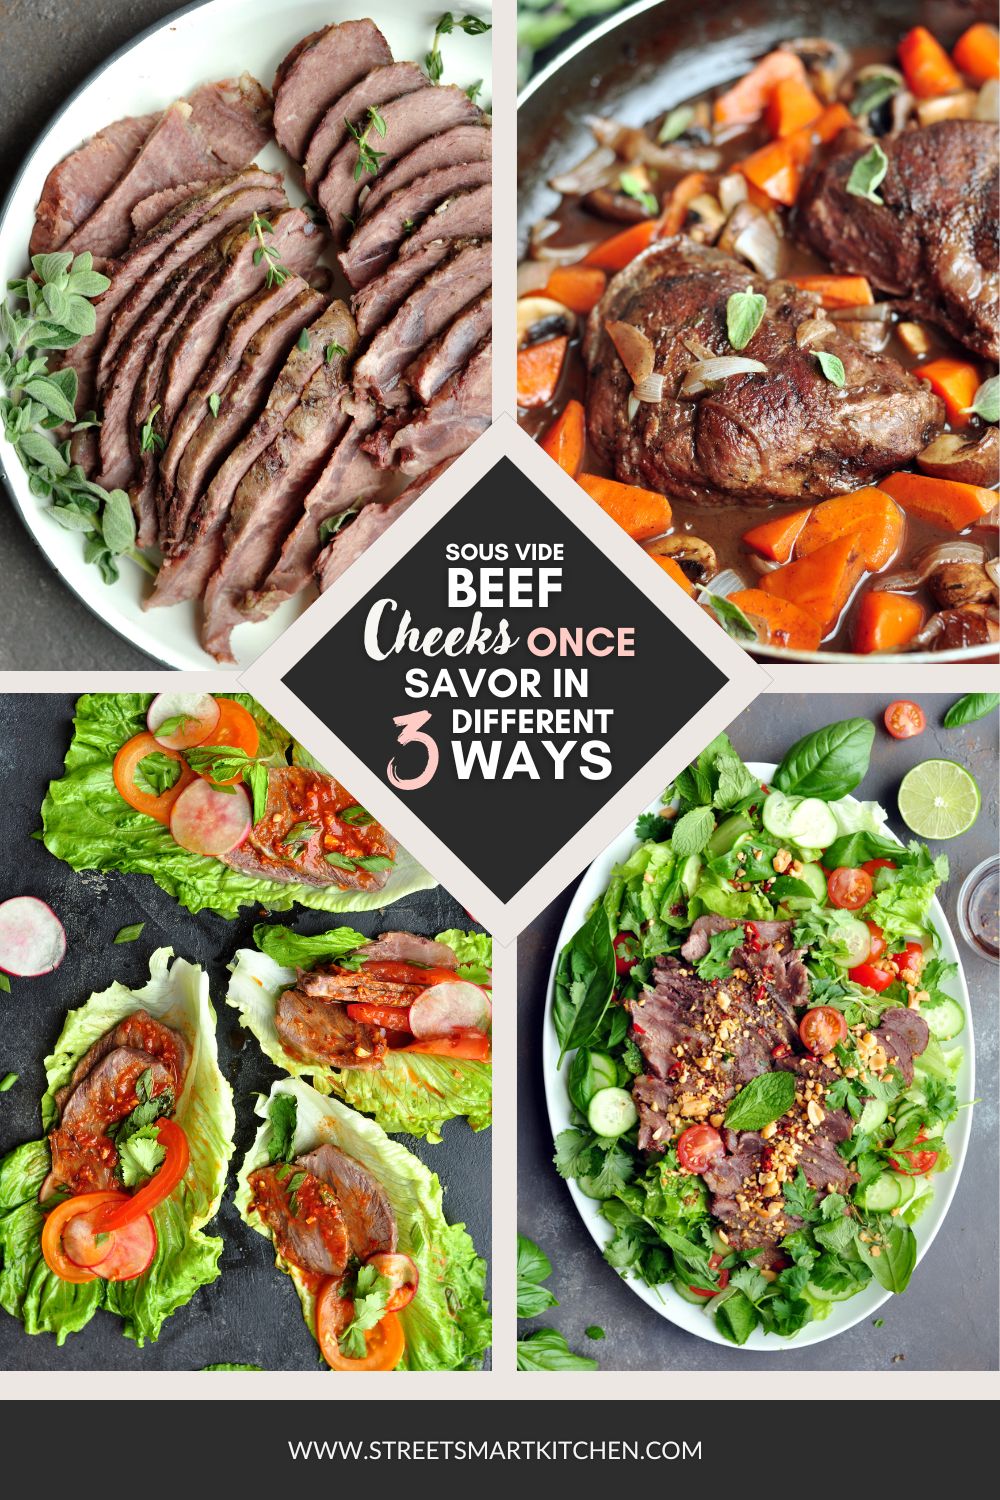
Sous Vide Beef Cheeks Once, Savor in 3 Different Ways
Learn how to sous vide beef cheeks and how to turn them into multiple different meals in 15 minutes or so whenever you want.
Have you cooked beef cheeks sous vide? If not, please put it on your to-do list. It will blow your mind.
If you have, we are going to do something a little different.
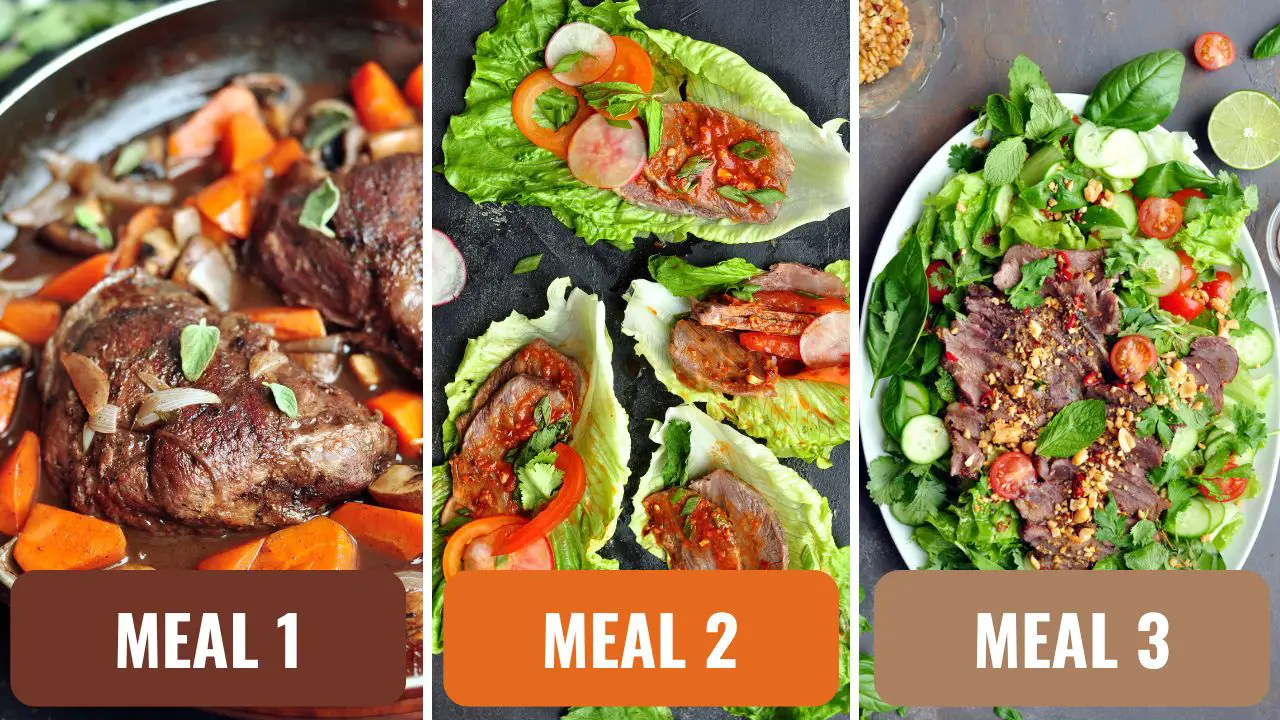
We will sous vide beef cheeks once and savor it in three different ways, including the classic beef cheeks with red wine sauce, delicious Korean beef lettuce wraps, and an authentic Thai beef salad.
Once you’ve got sous vide beef cheeks in your fridge or freezer, these three meals can be assembled in 15 minutes to 30 minutes whenever you want.
In this article, we’ll cover how to prep meals with sous vide beef cheeks and how to make them step by step. Get ready for some well-planned and serious deliciousness.
A Few Words on Beef Cheeks
Did you know that cattle make about 30,000 chewing movements per day?
As chewing muscles, the cheeks are subjected to heavy strain and are heavily infused with connective tissues. Due to the meat’s structure, several hours of cooking are necessary to turn the firm, connective tissue-rich cheek meat into a butter-tender flavor bomb.
Only through long, slow braising at low temperatures does the collagen transform into creamy, melting gelatin, making the beef cheeks tender and juicy and developing a distinctly intense flavor.
The cooking keywords here are long hours and low temperatures. That’s why beef cheeks are the perfect candidate for sous vide cooking.
Sous Vide Beef Cheeks Time and Temperature
Now, let’s look at the best time and temperature to sous vide beef cheeks.
I researched since I hadn’t cooked beef cheeks very often before, and they are not in my cookbook. And I found this fascinating Reddit thread where somebody did an in-depth experiment on six different time and temperature combinations for sous vide beef cheeks.
He also had his friends come over to taste-test the results, and the winning combination was 180°F (82°C) for 9 hours. So, I followed suit and absolutely loved the fork-tender and braised-like texture.
Here are sous vide beef cheeks time and temperature options. You can choose based on your preference and schedule.
| Temperature | Time | Doneness and Texture |
| 131°F (55°C) | 48 hours | Steak-like medium-rare |
| 140°F (60°C) | 48 hours | Steak-like medium |
| 165°F (74°C) | 48 hours | Braised-like fork tender |
| 180°F (82°C) | 9-12 hours | Braised-like melt-in-your-mouth tender |
Essential Equipment
- A sous vide immersion circulator. I used an Anova Precision Cooker to cook the beef cheeks.
- A large pot or a sous vide container. My go-to is an Anova sous vide cooking container, which holds up to 16L of water with a removable lid and a rack. If you’re ready to pick up proper sous vide gear, consider getting this Anova set, which includes a sous vide machine and a container.
- A vacuum sealer. When it comes to sous vide meal prepping, I highly recommend using a vacuum sealer. It keeps your sous vide food fresh for longer and freezes quickly without freezer burn.
- Vacuum sealer rolls. For meal planning purposes, I cut three custom-cut bags from an 8-inch 50-ft vacuum sealer roll from Avid Armor for five pounds of beef cheeks, two cheeks in each bag. If you are wondering how to choose suitable bags for sous vide when cooking different foods, read Sous Vide Bags 101.
- A good knife. It is absolutely essential to a StreetSmart Chef. I used my favorite Global knife to slice my sous vide beef cheeks for different meals.

Meal Planning with Sous Vide Beef Cheeks
Deciding on How Many Beef Cheeks to Cook
The first step of meal planning is determining how much food to cook based on how many people you plan to serve.
For beef cheeks, each cheek usually weighs around 300-400 grams (11-14 ounces) but after sous vide cooking you will find that they shrink a little. Beef cheeks are decadent and rich, so one cheek can usually satisfy two people.
Here’s my meal plan with sous vide beef cheeks and I planned for 4 servings each. Therefore, I needed 6 beef cheeks. That’s around 5 pounds in total.
| Meal Name | Cuisine | Diet and Features | Time |
| Sous Vide Beef Cheeks with Red Wine Sauce | American | Gluten-Free / High-Protein / Low-Carb Friendly | Finish on stove, ready in 30 minutes |
| Korean Beef Lettuce Wraps | Korean | Gluten-Free / High-Protein / Low-Carb | No-cook, ready in 15 minutes |
| Thai Beef Salad | Thai | Gluten-Free / High-Protein / Low-Carb | No-cook, ready in 15 minutes |
Prepping the Beef Cheeks
When prepping the beef cheeks for sous vide, trimming and seasoning them with salt and pepper is all you need to do. The taste of the natural flavor of this cut is so unique that you can slice it up and enjoy it as is after sous vide cooking.
Allowing beef cheeks’ natural beefy flavor to come to its fullest provides a canvas for more creativity, AKA more meal options.
You see, using your sous vide machine to pre-cook beef cheeks can result in several completely different meals in less time than you thought possible. Those meals keep your taste buds happy and nourish your body and mind big time.
I have been doing sous vide meal prep this way for a few years. Want to learn more? Check my sous vide meal prep program here.
How to Sous Vide Beef Cheeks Step by Step
Now that we’ve got our meals planned out, we know how many beed cheeks to cook, and our equipment is lined up, it’s time to rock and roll.
- Preheat water to 180°F (82°C) using a sous vide machine.
- Prepare custom-cut sous vide bags. Because we planned for three meals, let’s prepare three custom-cut sous vide bags.
- Trim and season beef cheeks with a generous amount of salt and a pinch of ground black pepper on both sides.
- Place the beef cheeks in the sous vide bags and vacuum-seal them. Put two cheeks in each bag, add three cloves of garlic, a few sprigs of fresh thyme or rosemary, and some olive oil, and vacuum-seal the bags.
- Sous vide the beef cheeks. Submerge the bags in the pre-heated water and set the timer for 9 hours. Cover your cooking vessel to prevent water from evaporating.
- Store the sous vide beef cheeks. After the timer goes off, if you don’t use the beef cheeks immediately, transfer them directly into an ice-water bath to cool before refrigerating or freezing.
StreetSmart Sous Vide Cooking Tips
- Trimming: Ask the butcher to trim the beef cheeks for you. It’ll save you time, and they have sharper knives than you do. If you don’t trim your beef cheeks, it’s no big deal because most of the connective tissue melts away during long hours of cooking anyway.
- Reheating: Because beef cheeks contain collagen, the sous vide cooking juice gelatinizes quickly, especially in the fridge. Before making any of the planned meals, drop the beef cheeks bag (thaw the cheeks first if frozen) into a warm-water bath or sous vide bath at about 100°F (38°C) so the gelatin melts into a liquid again. Then, you can easily pat the pre-cooked beef cheeks dry and transform them into different cuisines.
Now that the beef cheeks are perfectly cooked and ready to go, let’s move on to the most exciting part: rounding out our meals.
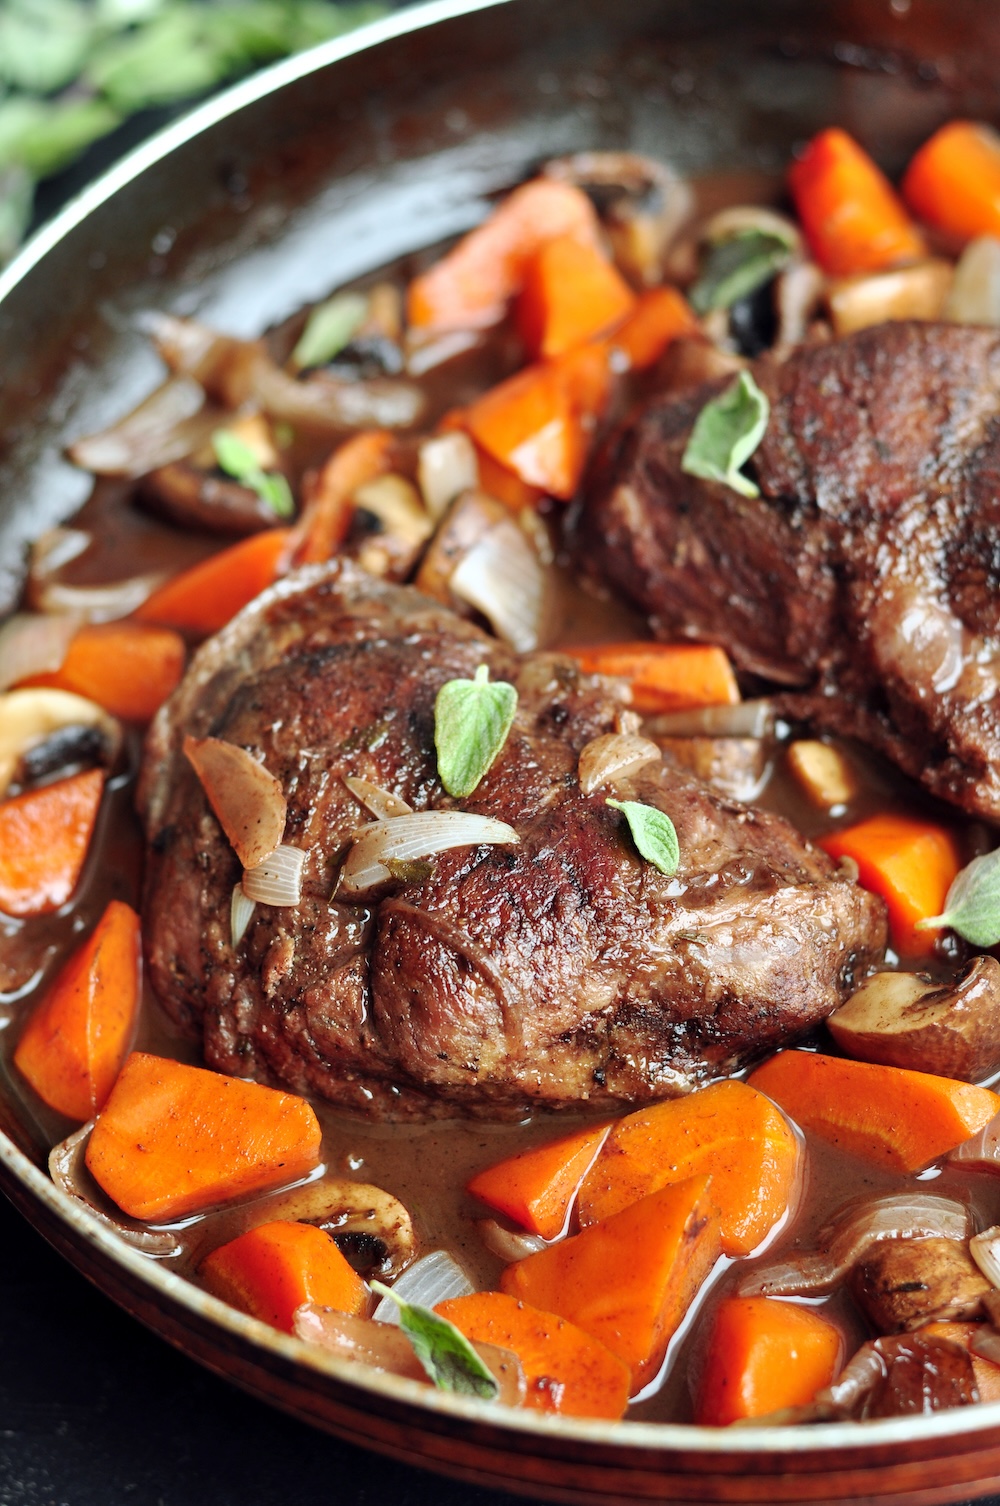
Meal #1: Sous Vide Beef Cheeks with Red Wine Sauce

Cooking this dish using the traditional method takes hours on the stove. But since our beef cheeks are pre-cooked, this classic and gourmet dish comes together in less than 30 minutes.
Here are the ingredients you’ll need.
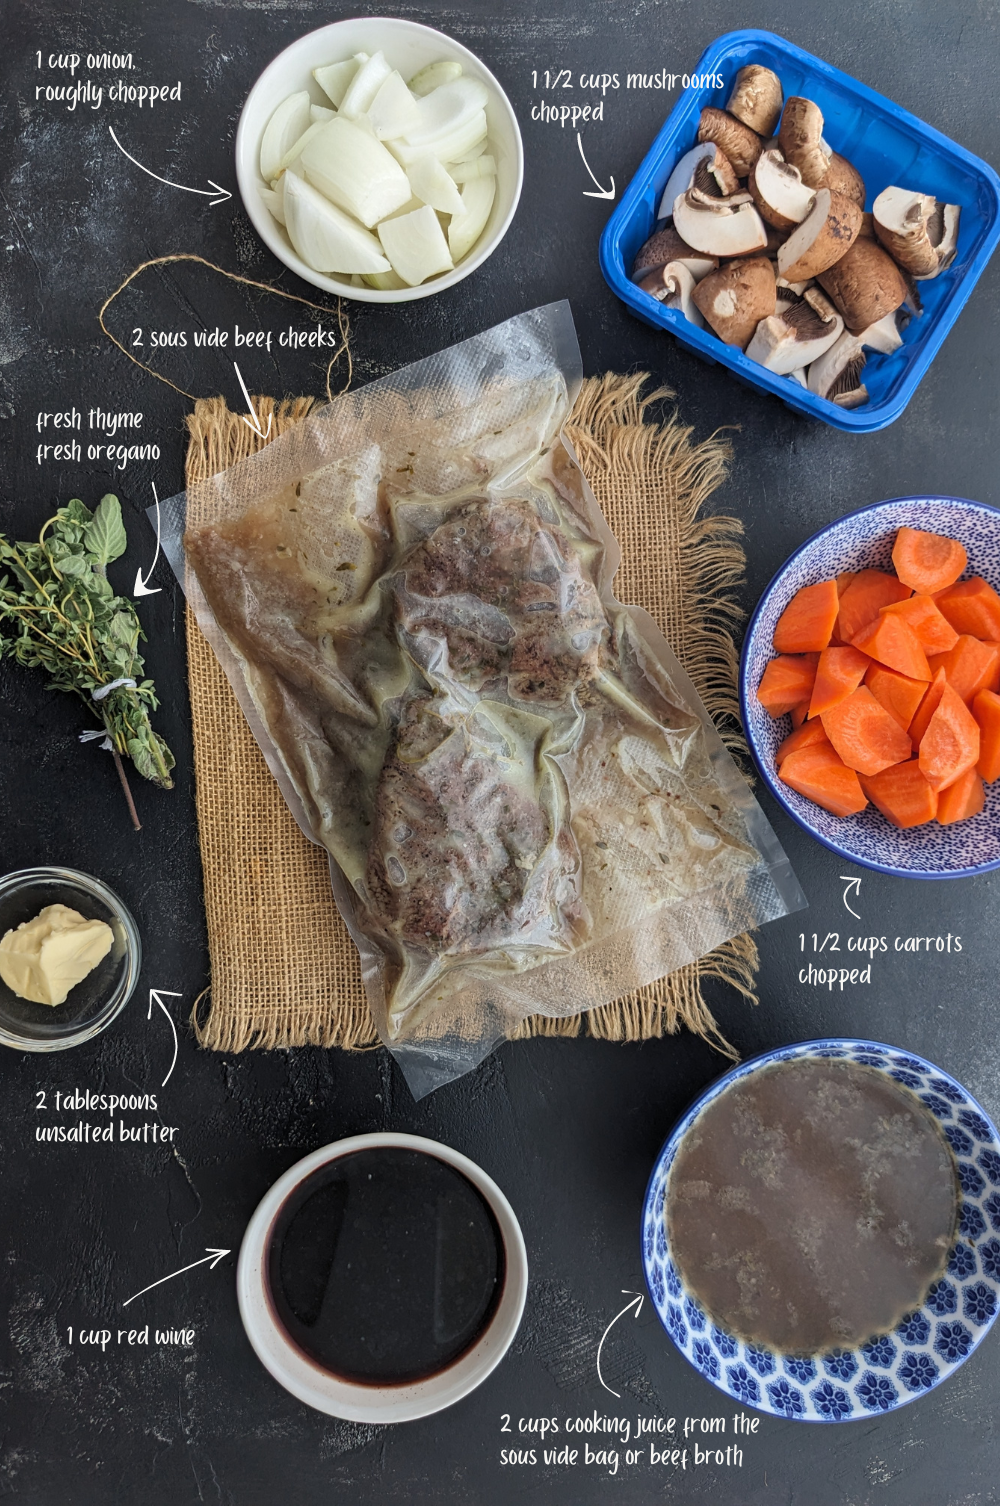
- One bag of sous vide beef cheeks containing two cheeks.
- Use unsalted butter to sear the beef cheeks and cook the red wine sauce.
- Cut some onions, carrots, and mushrooms to about the same size so they cook evenly. You can also add potatoes if you want.
- For the red wine, I am using Merlot here. You can also use Cabernet Sauvignon or Pinot Noir. Those wines reduce nicely in the sauce.
- Beef cheeks sous vide make the most wonderful juice. As the connective tissues and collagen break down during the slow cooking process, they form this thick, rich, and deeply flavorful broth that you should definitely keep. With that in your sauce, you don’t need a thickening agent. If there is not enough juice from your bag, add beef broth to make up the required amount.
- Last, a bunch of fresh herbs. Thyme, oregano, rosemary, and bay leaves are all good choices. Tie the herbs together so it’s easy to remove them after cooking.
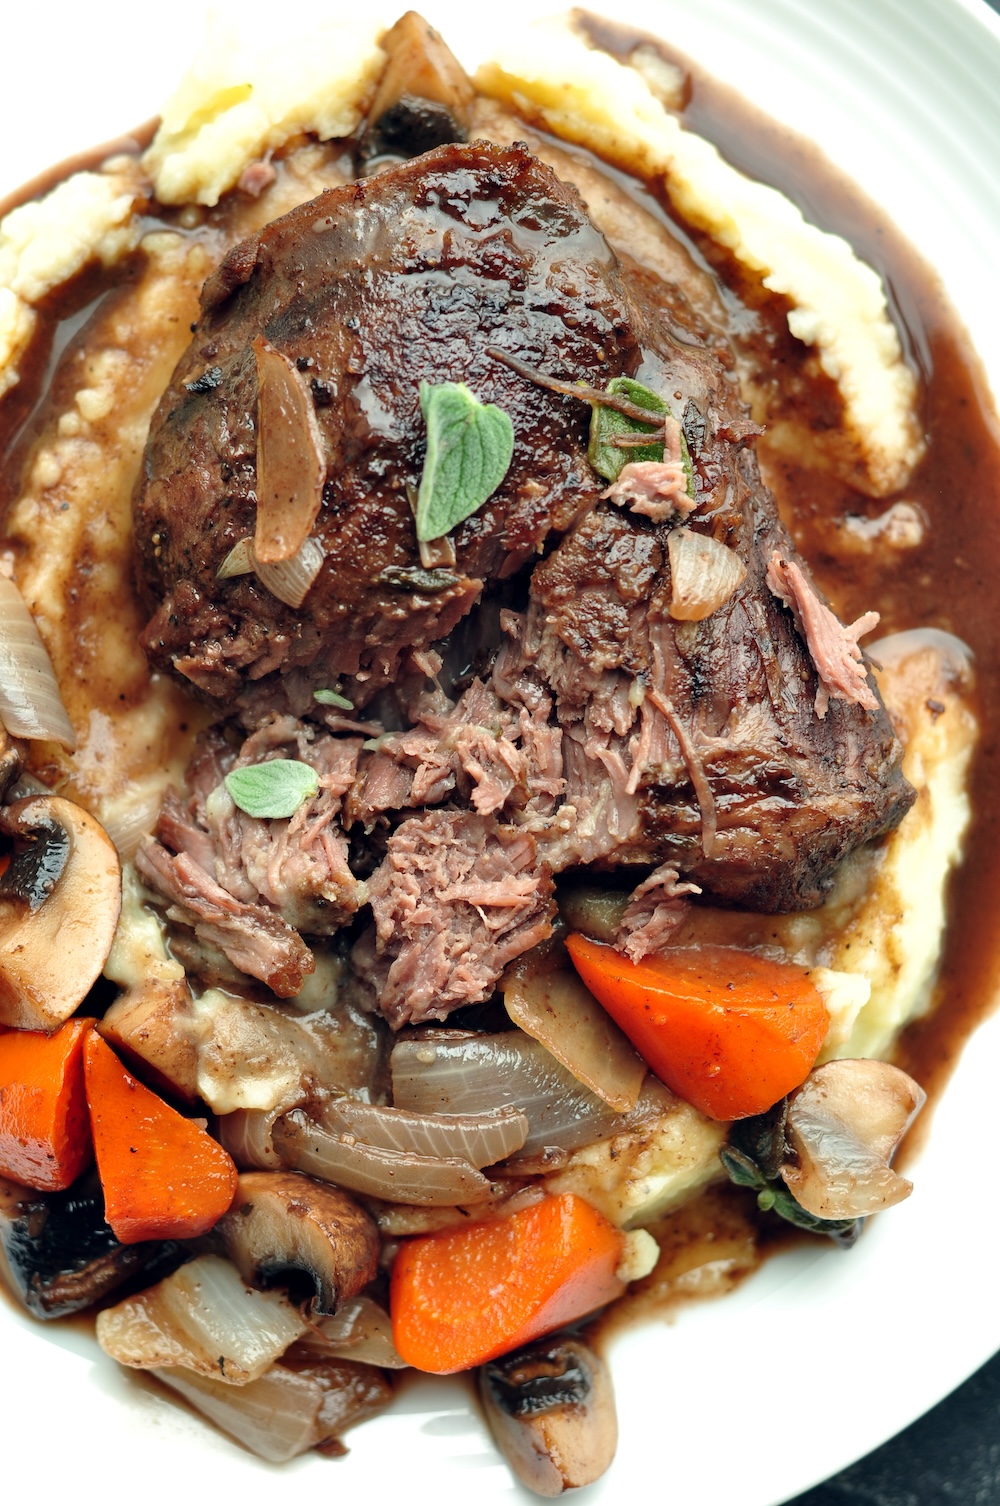
Serve it over mashed potatoes or cauliflower if you want to go low-carb, garnish with fresh herbs, and voilà!
Find the full recipe at the bottom of this article.
Meal #2: Korean Beef Lettuce Wraps
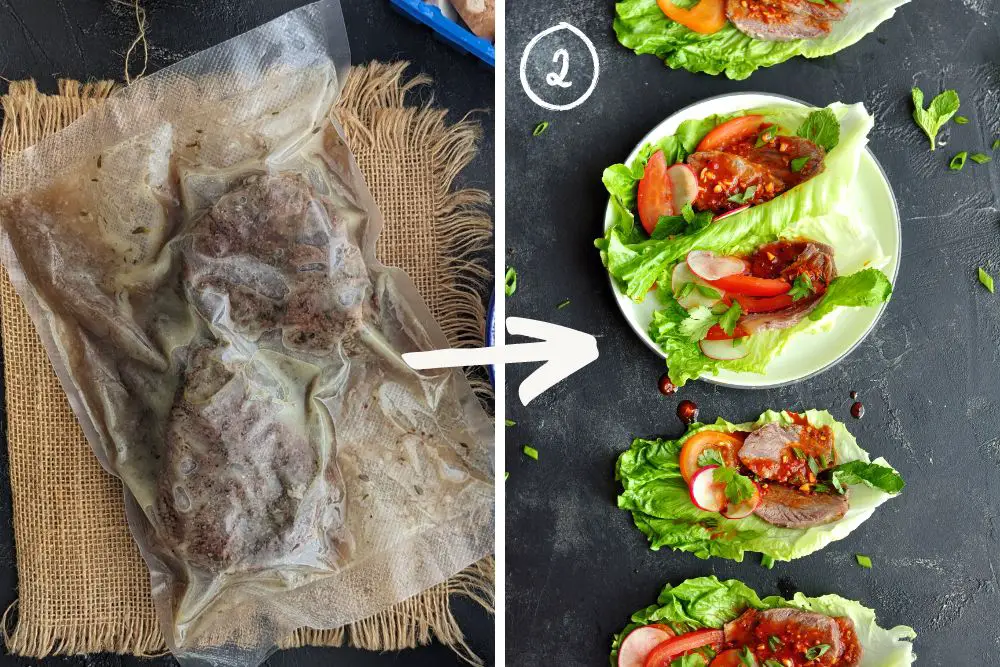
This one is super quick to put together. The secret is the Korean beef bulgogi sauce, which takes five minutes to whip together. You can use it as a dressing—that’s what we will do with our lettuce wraps. It’s also a fantastic marinade.
Once the sauce is ready, slice some sous vide beef cheeks, radishes, and tomatoes, then prepare some fresh mint leaves and chopped green onions. That’s all you need to do. Time to assemble a perfect wrap and enjoy!
Meal #3 Thai Beef Salad
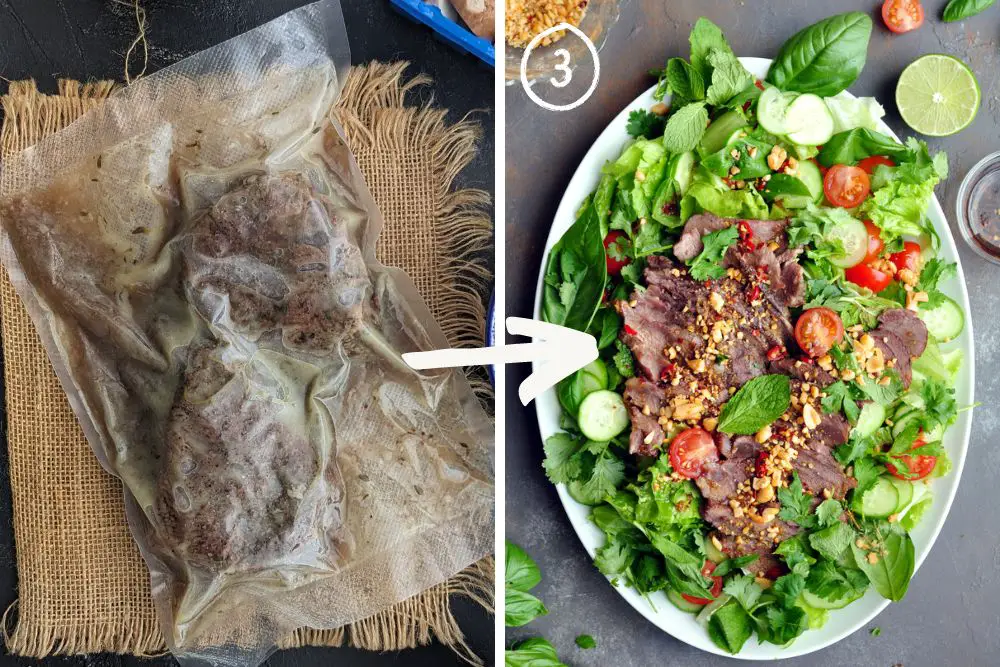
Like meal #2, this authentic Thai dish is ready in 15 minutes.
Similarly, you’ll start making a Thai beef salad dressing first. It’s made with tamari, fish sauce, coconut aminos, sesame oil, lime juice, garlic, ginger, and Thai chili peppers. So, the entire meal is gluten-free with no added refined sugar but bold flavors.
The rest is to assemble the salad with lettuce, tomatoes, cucumber, and lots of fresh herbs, along with sous vide beef cheeks and the dressing.
Find the step-by-step instructions and recipe here.
Here you have it – sous vide beef cheeks once, and savor them in three different ways.
The three dishes we just made are just the tip of the iceberg. There are so many things you could do with sous vide beef cheeks.
For example, you can make beef tacos and burrito bowls with sous vide beef cheeks. How about Vietnamese beef with vermicelli? Oh, and for the winter, you can make Taiwanese-style beef noodle soup or Szechuan-style beef noodle soup.
Oh boy. My mouth is watering as these dishes pop up in my head.
What meal would you make with your perfectly sous vide beef cheeks? Leave a comment and let me know.
Print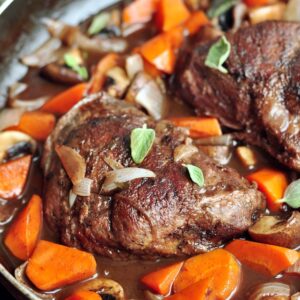
Sous Vide Beef Cheeks with Red Wine Sauce Recipe
- Prep Time: 10 minutes
- Cook Time: 20 minutes
- Total Time: 30 minutes
- Yield: 4 servings 1x
- Category: Main Course
- Method: Sous Vide + Stovetop
- Cuisine: American
- Diet: Gluten Free
Description
When the classic beef cheeks in red wine sauce meet the modern sous vide cooking method, you can serve up this gourmet dish in the comfort of your home anytime.
Ingredients
- 2 sous vide beef cheeks in one bag (the cooked cheeks are about 1.5 pounds)
- 2 tablespoons unsalted butter
- 1 cup white onion, roughly chopped
- 1 1/2 cups carrots, chopped
- 1 1/2 cups mushrooms, chopped
- 1 cup red wine
- 2 cups cooking juice from the sous vide bag (Add beef broth if it’s not enough)
- A few sprigs of fresh thyme, oregano, 3 bay leaves, tied together
Instructions
- Prepare the sous vide beef cheeks: Place the bag of sous vide beef cheeks (unopened) in a pot of warm water or a 100°F (38°C) sous vide bath to melt the gelatin into liquid form. Open the bag, transfer the beef cheeks to a plate, and pat them dry with paper towels, reserving the cooking juice in the bag.
- Sear the beef cheeks: Over medium-high heat, melt butter in a non-stick pan with decent depth. Place the beef cheeks in the hot pan to sear, about one minute on each side, or until the surface is slightly charred. Remove the cheeks to the same plate you used to dry them before.
- Make the red wine sauce: In the same pan, still hot, add onions and carrots. Stir a few times to get them to start cooking. Add red wine and pour the reserved cooking juice with the garlic from the bag into the pan. (Add beef broth if the juice is less than 2 cups.) Bring to a boil, uncovered, and cook for about 15 minutes until the sauce is reduced by half. Add mushrooms and a bundle of prepared herbs. Cover and cook until the carrots are tender and the mushrooms are cooked through about 5 to 7 minutes.
- Finish it up: Nest the beef cheeks in the pan with red wine sauce and vegetables to bring them to temperature. Spoon the sauce over the beef cheeks constantly.
- Serve: Serve the beef cheeks over mashed potatoes or mashed cauliflower. Spoon the vegetables and red wine sauce over. Garnish with fresh herbs. Voila!
Notes
This meal is part of the meal plan with sous vide beef cheeks. To sous vide beef cheeks, please follow the instructions below or refer to the step-by-step guide in my article.
- Preheat water to 180°F (82°C) or to your desired temperature, following the time and temperature chart in my article.
- Trim and season beef cheeks with a generous amount of salt and a pinch of pepper on both sides.
- Place the beef cheeks in multiple sous vide bags (I usually do two cheeks per bag), add three cloves of garlic and a few sprigs of fresh thyme or rosemary in each bag, and follow with some olive oil. Vacuum-seal the bags.
- Submerge the bags in the pre-heated water and set the timer for 9 hours (or longer if you cook at a different temperature). Cover your cooking vessel to prevent water from evaporating.
- After the timer goes off, if you don’t use the beef cheeks immediately, transfer them directly into an ice-water bath to cool before refrigerating or freezing.
Nutrition
- Serving Size: 1
- Calories: 443
- Sugar: 4.8g
- Sodium: 786.8mg
- Fat: 16.7g
- Saturated Fat: 8.1g
- Carbohydrates: 11.9g
- Fiber: 2.4g
- Protein: 48.7g
- Cholesterol: 143.1mg
About the Author

Sharon Chen is an Integrative Nutrition Health Coach and author of the Complete Sous Vide Cookbook. She believes food not only brings healing but also connection. As the creator of StreetSmart Kitchen, she aims to make meal prep easier than ever and help you find balance, ease, joy, and simplicity in the kitchen as you improve your well-being.
This sous vide was so rich and delicious! A new go-to when I want something special!
Cool. Thanks Paula!
I made the sous vide beef cheeks for the Thai beef salad, it turned out incredibly tender and flavorful. The recipe made it easy to achieve that melt-in-your-mouth texture. Thanks for this delicious twist on a classic dish!
Thank you so much for sharing your cooking experience, Heather. I am glad to hear that you enjoyed the Thai beef salad with sous vide beef cheeks!
These came out so tender and juicy. Sous vide is the way to go!
Thank you! Very happy to hear that.
Such a great recipe with plenty of herbs, thank you for sharing
Thank you for stopping by, Jackie!
Cooking beef cheeks is new to me and I found your recipe at Pinterest. Looks incredible!
Thank you so much, Katherine!